

Happy Valentine’s Day friends! I found out about an extra Valentine’s Day celebration for one of my kiddos at school so I decided to make an extra heart project for him to give to his classmates. I made these cute heart shaped fabric bags filled with rice and I thought I would share a tutorial for you guys to make them as well. You can put them in the microwave and warm them up for a minute and use them as a heat pack, or you can put them in the freezer and use them as a cold pack. You could even heat them up and then put them under your sheets by your feet to warm up your toes!
They are quick and easy to make and are a perfect Valentine’s Day gift. They would also be a sweet Christmas gift, or get well soon gift, or a birthday gift, or they would be a nice thing to send to a new to college student away from home for the first time. The options are endless, and I am sure you have all of the supplies you need on hand already. You might find yourself making a whole batch like I did!
DOWNLOAD THE HAPPY HEART ORNAMENT PATTERN HERE
You Will Need
- Large fabric scraps, each side needs about 9″ wide by 7″ tall
- Scissors (These are my all time favorites*)
- Fabric marking pen or pencil (I like Frixion*)
- Hand sewing needles (Anything like this works*)
- Matching thread
- Rice. I used about 1¼ cups per heart (Not instant. Dried corn would work if you don’t have rice)
- Measuring cups, I used a ½ cup and a ¼ cup
Optional Supplies (Not necessary, but handy if you have them)
- Pins (I like these*)
- Chopstick for turning
- Funnel
- Dried Lavender or essential oils (I happened to have these on hand*)

1. Download the pattern printable and cut out the heart. Use your marking pencil or pen to trace the heart onto your fabric. Make sure to mark the two sides of the “Leave Open” section so you know where to start and stop sewing. Carefully cut out the heart.

2. With the right sides of the fabric facing, and using a ¼” seam allowance, sew the two sides of the heart together. Be sure to start sewing on one side of the “Leave Open” section and stop sewing on the other side of the “Leave Open” section.
When sewing the curves of the heart go slowly and just sew a few stitches, lift your presser foot to adjust to the curve, and then sew a few more stitches until you get around both curves. These curves are pretty gentle so you may not need to do too much lifting of your foot, but just be mindful as you sew the curves.

3. Once you have sewn the two sides together, use your scissors to trim right up to the seam (but not through it) in the dip on the top of the heart. I end up removing most of the seam allowance here to make the point lay flat once turned. Snip a few more spots around both of the curves to help the seam lay flat once turned. Trim the seam allowance off from the bottom point of the heart as well to help it be pointy once turned. Again, trim to the seam but not through it!


4. Turn the heart right side out. I use a chopstick to help in turning and then I run the point of the chopstick along all the seams of the heart to help shape the heart once turned.

5. Turn the “Leave Open” section 1/4″ in and use your fingers to press the seam. You can also use an iron, but I find finger pressing generally does the trick.

6. It is time to fill your heart! If you have a funnel use it, but I didn’t have one. Not a problem at all! Grab a piece of scrap paper and curl it into a funnel. Double check the tip of the funnel fits into your open section on your heart and then you can put a piece of tape or two on the paper to hold it in place. Or, if you are like me and couldn’t find your tape, a couple staples will also do the trick.

7. I used around one and a quarter cups of rice per heart. But you can see in the photo I under-filled the measuring cups somewhat. The smaller one is a quarter cup measure, and the bigger one is a half cup I filled like this twice. Do what works feels right to you for the rice. More would be fine too.
For the lavender, this in the little yellow bag is what was left in one of my sachets after I had already filled multiple other hearts. I ended up adding all of this lavender, but again add what feels right to you. You certainly don’t have to add lavender, I just happened to have some and thought it would be a nice addition. You could also add a few drops of any essential oil you like. Or, if you are sensitive to smell, or don’t have lavender or essential oils, you don’t need to add any and it will still be great.


8. Place your funnel, or paper funnel, into the opening in the heart and make sure it is fairly securely in there. Begin to add your rice. Warning: it may go everywhere…….


9. I added a half cup and a quarter cup of rice, then added my lavender, and then finished with the last half cup of rice. This seemed to work well for getting the lavender all throughout the heart. Once all of the rice and lavender were added, I carefully set down the heart making sure all of the contents were to the bottom so they wouldn’t go all over the place as I closed the heart.

10. Once your heart is stuffed use a matching thread and a ladder stitch (or your preferred method) to close the seam. I kept my stitches fairly close together to help keep the rice in. Also since these were going to 8 and 9 year olds and my first one got tossed all over the house like a projectile.

11. Once you have closed the opening, tie your thread in a knot and put your needle through the seam to hide the end of the thread on the inside of the heart. Pull the needle and thread out from side of the heart and pull the thread taut. Use your scissors to trim it flush with the heart and hide the end.

Tah-dah! Finished heart!

Here are some of the different fabrics I used.

They look cute as multiples!
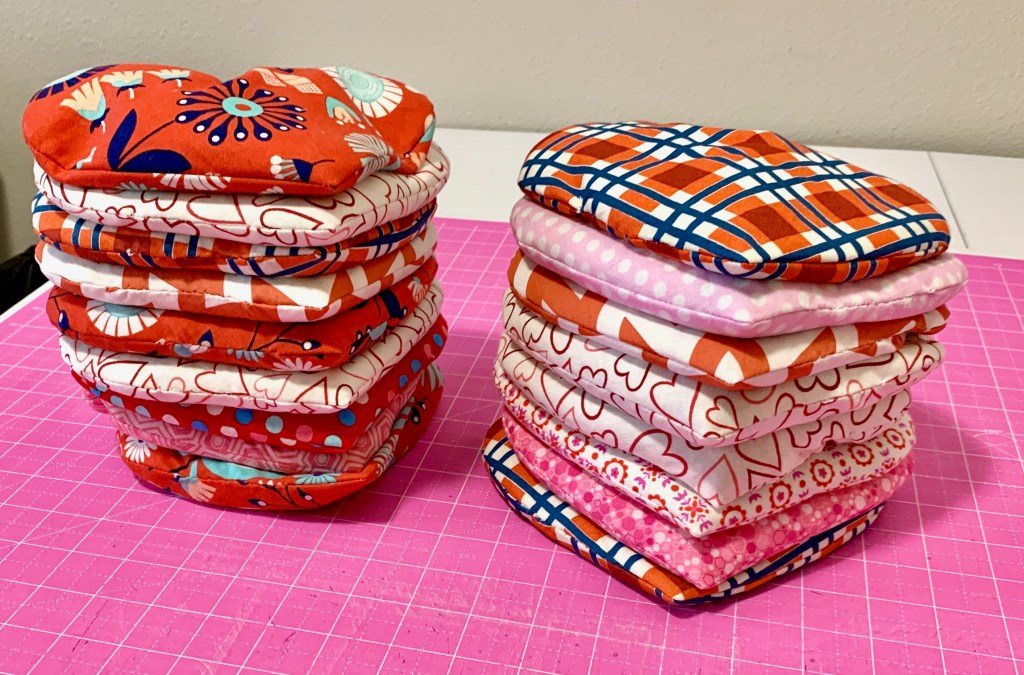
These were all the ones I made stacked up. All of my years of fabric hoarding paid off since I had plenty of large scraps of red and pink fabrics that I could use already in my stash!
I even found a cute tag with a sweet little poem on it to pin to our hearts for gifting over on Artsy-Fartsy Mama. She even had multiple colors to choose from!
There you go, more happy heart projects for you! I hope you make lots of hearts and spread some love! Or I guess I could be super cheesy and say I hope you make one of these and warm someone’s heart. Use the hashtag #happyheartricebag or #binthestudio to share your creations with me!
Happy Making-

*Links marked with * are affiliate links that I may earn a small commission from at no cost to you in order to help me keep my blog and free tutorials like this one going.
Pingback: WIP Wednesday #11 - B In The Studio
Pingback: The Happy Heart Pincushion Tutorial - B In The Studio